ECE375: Using an Arduino Uno as a programmer
I have an atmega128 development board for the ECE375 class at Oregon State University. I believe the board is good, because it runs the test program that it came with when I picked it up from TekBots. I also have an Olimex AVR-ISP-MK2 programmer inherited from an ECE major friend, which I have come to conclude is bad, because despite testing and rebuilding all of the connections between it and my atmega128 board, despite passing avrdude all of the force and override-warnings flags at my disposal, it consistently refuses to program.
Since my assignment is due tomorrow, I am configuring an Arduino Uno to stand in as a programmer. Here’s how.
I’m following the ArduinoISP tutorial to turn an Uno left over from another project into a programmer.
Add a capacitor
First, I scrounged a 10uF capacitor out of a failed attempt at building an audio amp. The capacitor goes on the Uno with its negative leg (the side with the stripe) connected to ground, and the other leg connected to the pin labeled reset.
This is necessary to prevent spurious resets. If noise or interference on the board caused the reset line to fall below a certain minimum voltage (the logic low threshhold), the Uno would reset when the user didn’t tell it to. The capacitor stores up electricity and can provide a tiny supply of power to keep the reset line high during fluctations, so that the board will only be reset if it’s being actively driven low for more than just a moment.
I asked a grad student in Electrical Engineering about the capacitor required by the tutorial, and he claimed that 10 uF is probably overkill – a 0.1uF ceramic cap would do the job just as well. So if you’re following this tutotial and only have a small capacitor available, try it anyways, and the worst that could happen without it is an occasional board reset during programming.
Program the Arduino Uno
I installed the Arduino toolchain and IDE with yaourt -S arduino-beta, since the regular arduino package was failing to download at the time I tried.
I downloaded and unzipped the mega-isp firmware, then opened it in the Arduino ide with sudo arduino ArduinoISP.pde.
When I attempted to compile and upload, it threw several errors:
ArduinoISP.pde:36:14: error: expected unqualified-id before numeric constant
/usr/share/arduino/hardware/arduino/avr/variants/standard/pins_arduino.h:41:22: note: in expansion of macro 'MOSI'
static const uint8_t MOSI = 11;
                      ^
ArduinoISP.pde:35:14: error: expected unqualified-id before numeric constant
/usr/share/arduino/hardware/arduino/avr/variants/standard/pins_arduino.h:42:22: note: in expansion of macro 'MISO'
static const uint8_t MISO = 12;
                      ^
ArduinoISP.pde:34:13: error: expected unqualified-id before numeric constant
/usr/share/arduino/hardware/arduino/avr/variants/standard/pins_arduino.h:43:22: note: in expansion of macro 'SCK'
static const uint8_t SCK  = 13;
                      ^
Error compiling.
Since MISO, MOSI, and SCK were having a namespace conflict with a header file, the easiest fix was to replace their strings with MYMISO, MYMOSI, and MYSCK throughout the ArduinoISP file. I’d guess they were added to the header files after the ArduinoISP software was published, since my version of the Arduino IDE is much more recent than the ISP’s publication date of 2009.
Note
When saving these changes, the IDE asks if it’s ok to change the extension from .pde to .ino. Just say yes; the file extension doesn’t make any real difference.
The next set of errors is:
/usr/share/arduino/hardware/tools/avr/bin/avrdude: error while loading shared
libraries: libtinfo.so.5: cannot open shared object file: No such file or
directory
A quick Google for the error has the Arch Wiki page among the first hits, and the fix is straightforward:
$ cd /usr/lib
$ sudo ln -s libncurses.so.5 libtinfo.so.5
After symlinking the libraries, my next error on attempting to program is:
avrdude: ser_open(): can't open device "COM1": No such file or directory
ioctl("TIOCMGET"): Inappropriate ioctl for device
This would normally mean you get to mess around with groups or just invoke the IDE as root. Since I’m already running it with sudo, it’s a hint that Arch named the device something funny when it registered. In the Arduino IDE’s menus, clicking Tools -> Port -> /dev/TTYACM0 (Arduino Uno)
My next error was:
avrdude: stk500_getsync(): not in sync: resp=0x00
At the suggestion of this site, I unplugged the capacitor from the RESET pin and tried again. It uploaded without error.
Wire the Uno up to the ATMEGA128
My ECE friend helped me read the ATMEGA board schematic and figure out what the pins in the 10-pin header do. Here’s my ugly ASCII art of the header (note that the notch faces toward the inside of the board):
-----------
|a b c d e|
|f g h i j|
----___----
| Arduino Uno Pin | Name | Wire Color | ATMEGA Pin |
|---|---|---|---|
| 10 | reset | gray | h |
| 11 | MOSI | white | f |
| 12 | MISO | black | j |
| 13 | SCK | brown | i |
| GND | GND | blue | b,c,d,e |
| +5V | +5V | purple | a |
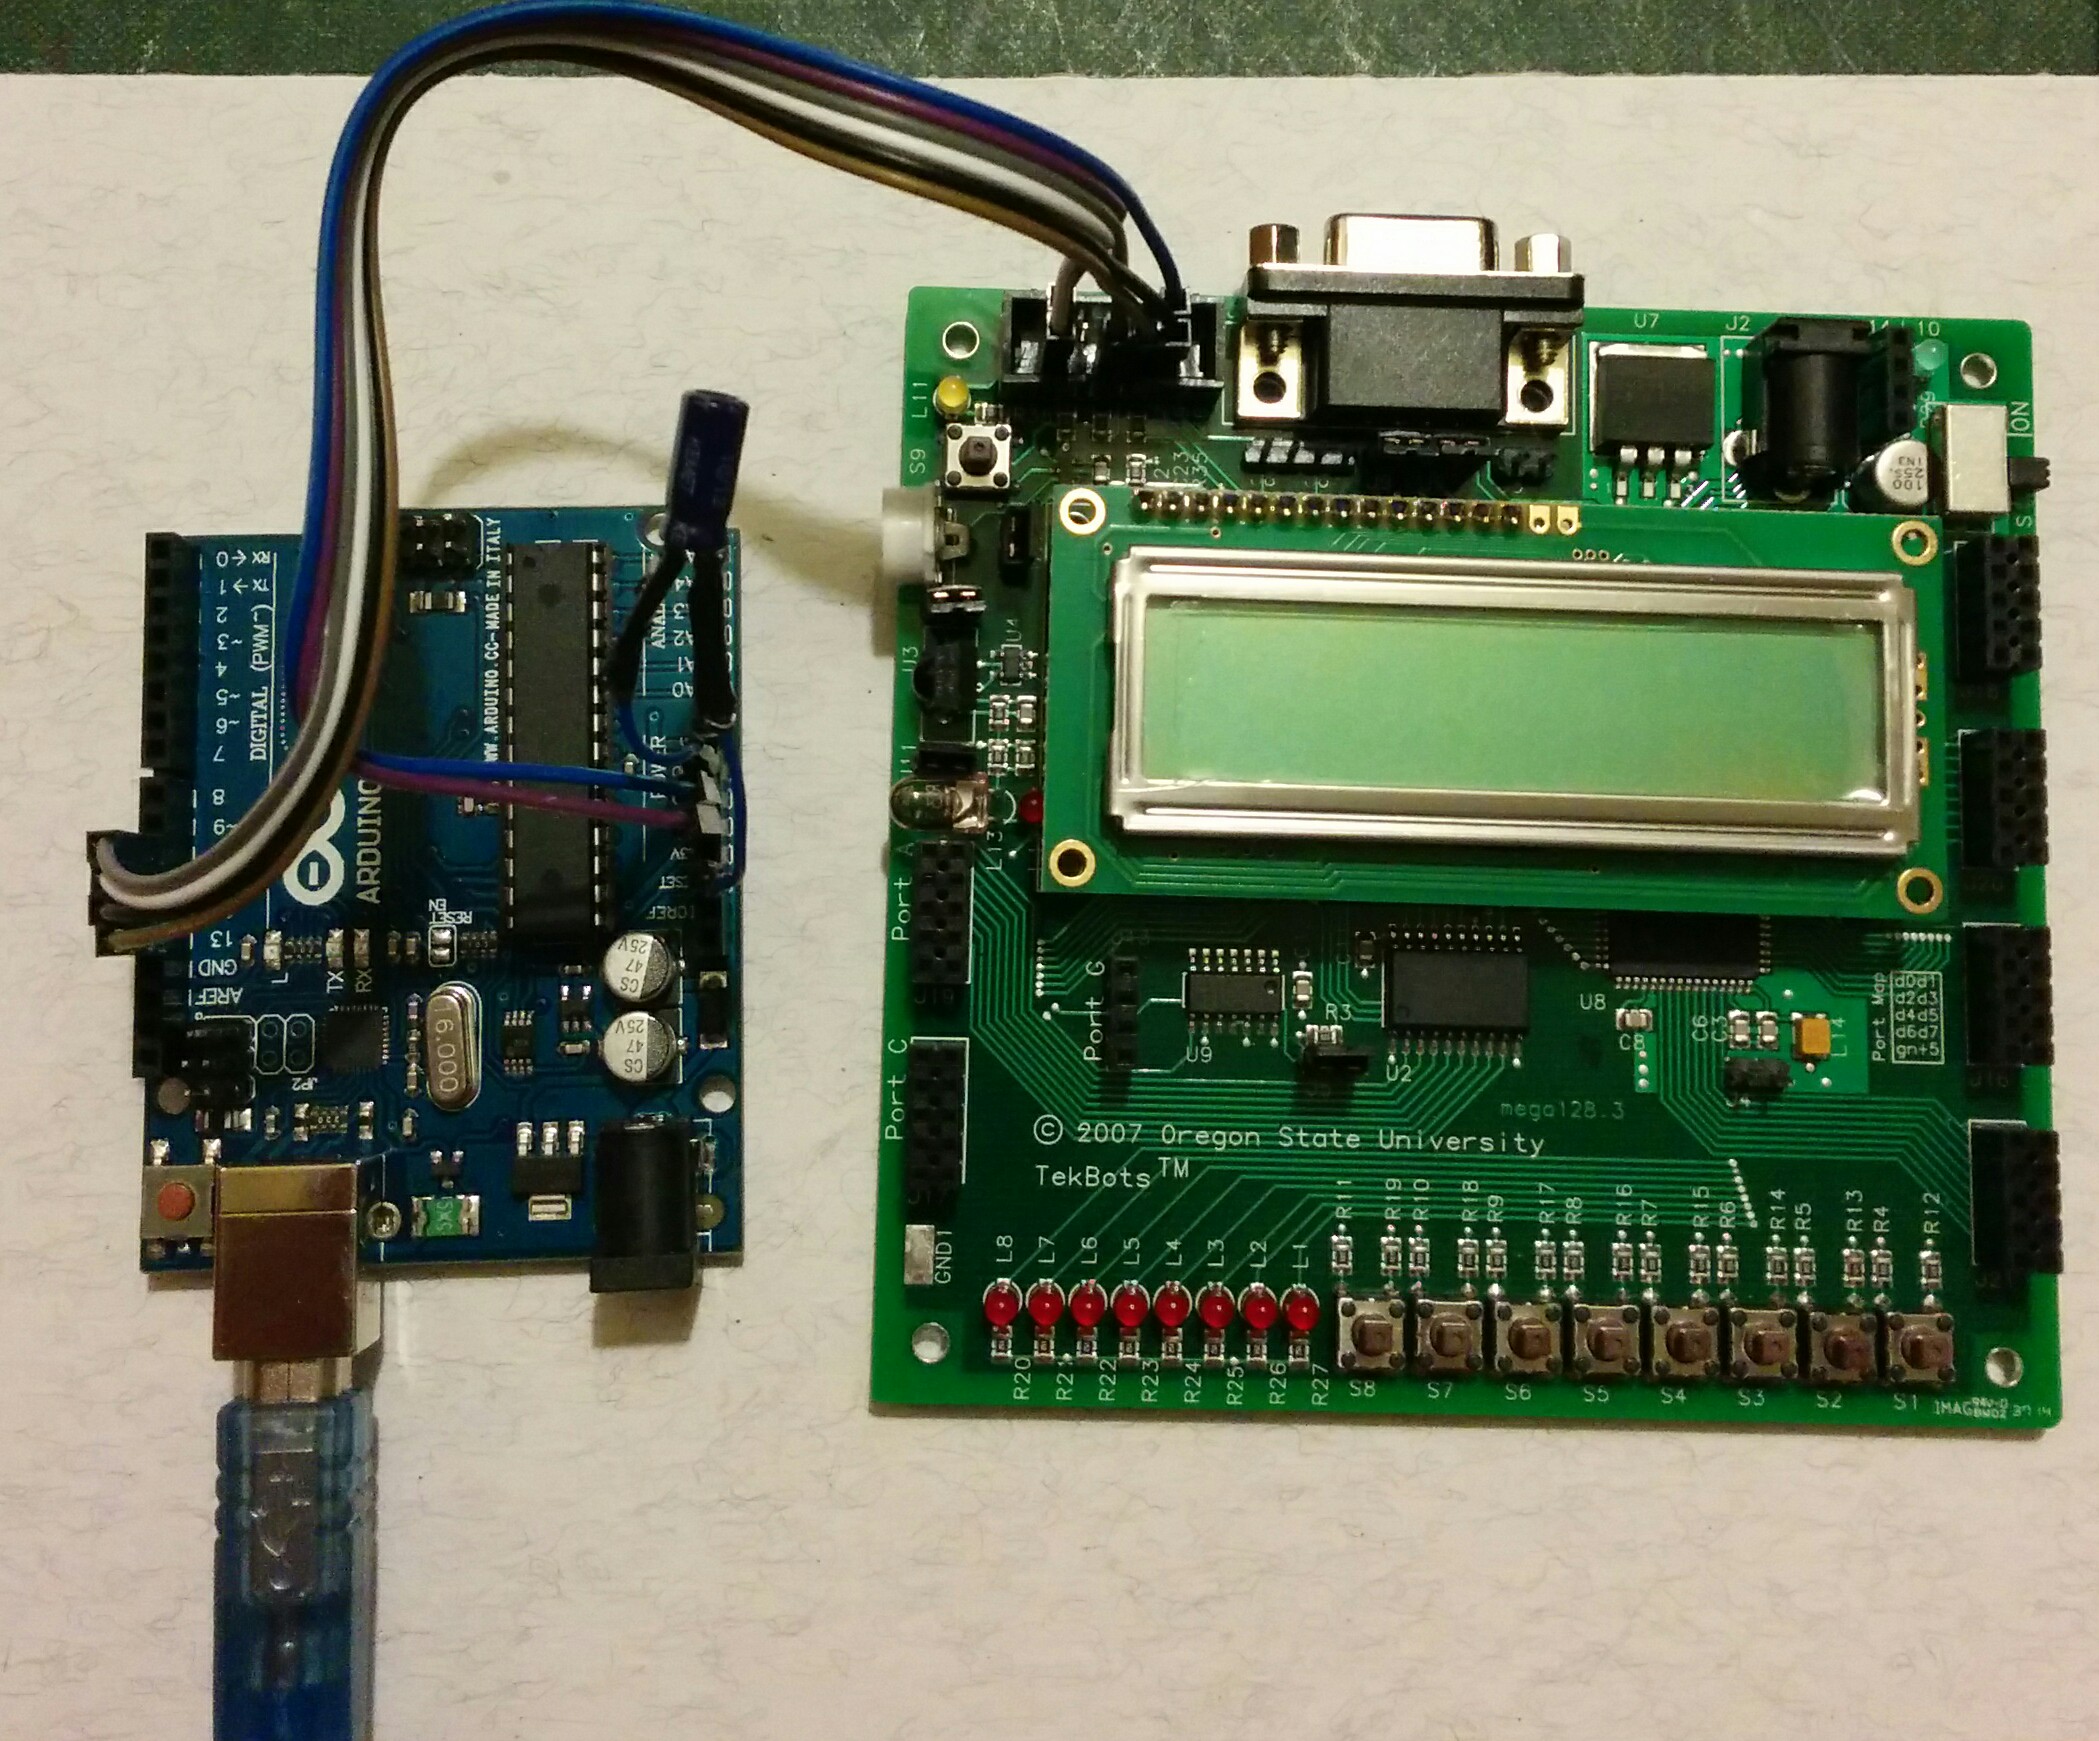
Surprisingly, the ATMEGA128 runs its test program quite happily when powered off of only the 5V line from the Uno. Here’s a picture of the setup:
Program the ATMEGA
A writeup on the Arduino Playground provides the outline for my avrdude incantation. To find the actual port in use, I unplug and replug the Uno then examine the output of dmesg | tail to see:
[28403.507844] cdc_acm 3-1:1.0: ttyACM1: USB ACM device
This means that the Uno is showing up in /dev/ttyACM1.
Note
With the capacitor plugged in, I get the error:
avrdude: stk500_recv(): programmer is not responding
so I’m unplugging the cap for now and hoping that it works.
For some code to test uploading with, I’m using Mythmon’s Hello Dave game.
The installation command will look something like:
sudo avrdude -p m128 -c avrisp -P /dev/ttyACM1 -U flash:w:hellodave.hex

avrdude: AVR device initialized and ready to accept instructions

Reading | ################################################## | 100% 0.01s

avrdude: Device signature = 0x000000
avrdude: Yikes!  Invalid device signature.
        Double check connections and try again, or use -F to override
        this check.
When I pass the -F flag, it gets as far as a signature mismatch:
sudo avrdude -p m128 -c avrisp -F -P /dev/ttyACM1 -U flash:w:hellodave.hex

avrdude: AVR device initialized and ready to accept instructions

Reading | ################################################## | 100% 0.01s

avrdude: Device signature = 0x000000
avrdude: Yikes!  Invalid device signature.
avrdude: NOTE: FLASH memory has been specified, an erase cycle will be performed
         To disable this feature, specify the -D option.
avrdude: erasing chip
avrdude: reading input file "hellodave.hex"
avrdude: input file hellodave.hex auto detected as Intel Hex
avrdude: writing flash (2468 bytes):

Writing | ################################################## | 100% 0.32s

avrdude: 2468 bytes of flash written
avrdude: verifying flash memory against hellodave.hex:
avrdude: load data flash data from input file hellodave.hex:
avrdude: input file hellodave.hex auto detected as Intel Hex
avrdude: input file hellodave.hex contains 2468 bytes
avrdude: reading on-chip flash data:

Reading | ################################################## | 100% 0.28s

avrdude: verifying ...
avrdude: verification error, first mismatch at byte 0x0080
         0xff != 0x10
avrdude: verification error; content mismatch

avrdude: safemode: Fuses OK

avrdude done.  Thank you.