DIY Shoe Chains
The Pacific Northwest is dangerously frozen at the moment. Other regions handle conditions like this just fine. But a freeze like this is especially dangerous to us because most people are unprepared for it.
Right now we’ve got a bunch of frozen sleet on the ground that looks like snow, but offers the traction of an ice skating rink. This morning I thought I could cross the “snow” in regular shoes, and fell (embarrassingly, but non-injuriously) immediately. I was able to go inside and put on my shoe chains because I keep a pair on hand for occasions like this, and with chains the ice was as easy to walk on as snow would be. But it got me thinking about people who might not have thought ahead to own shoe chains. You can’t just order a pair for use today; nobody’s delivering anything in this weather.
So I did a quick experiment to see whether adequate shoe chains could be assembled out of stuff that a normal person might have on hand. All the commercial ones really are, after all, is a piece of something stretchy and some chain. Image below the fold.
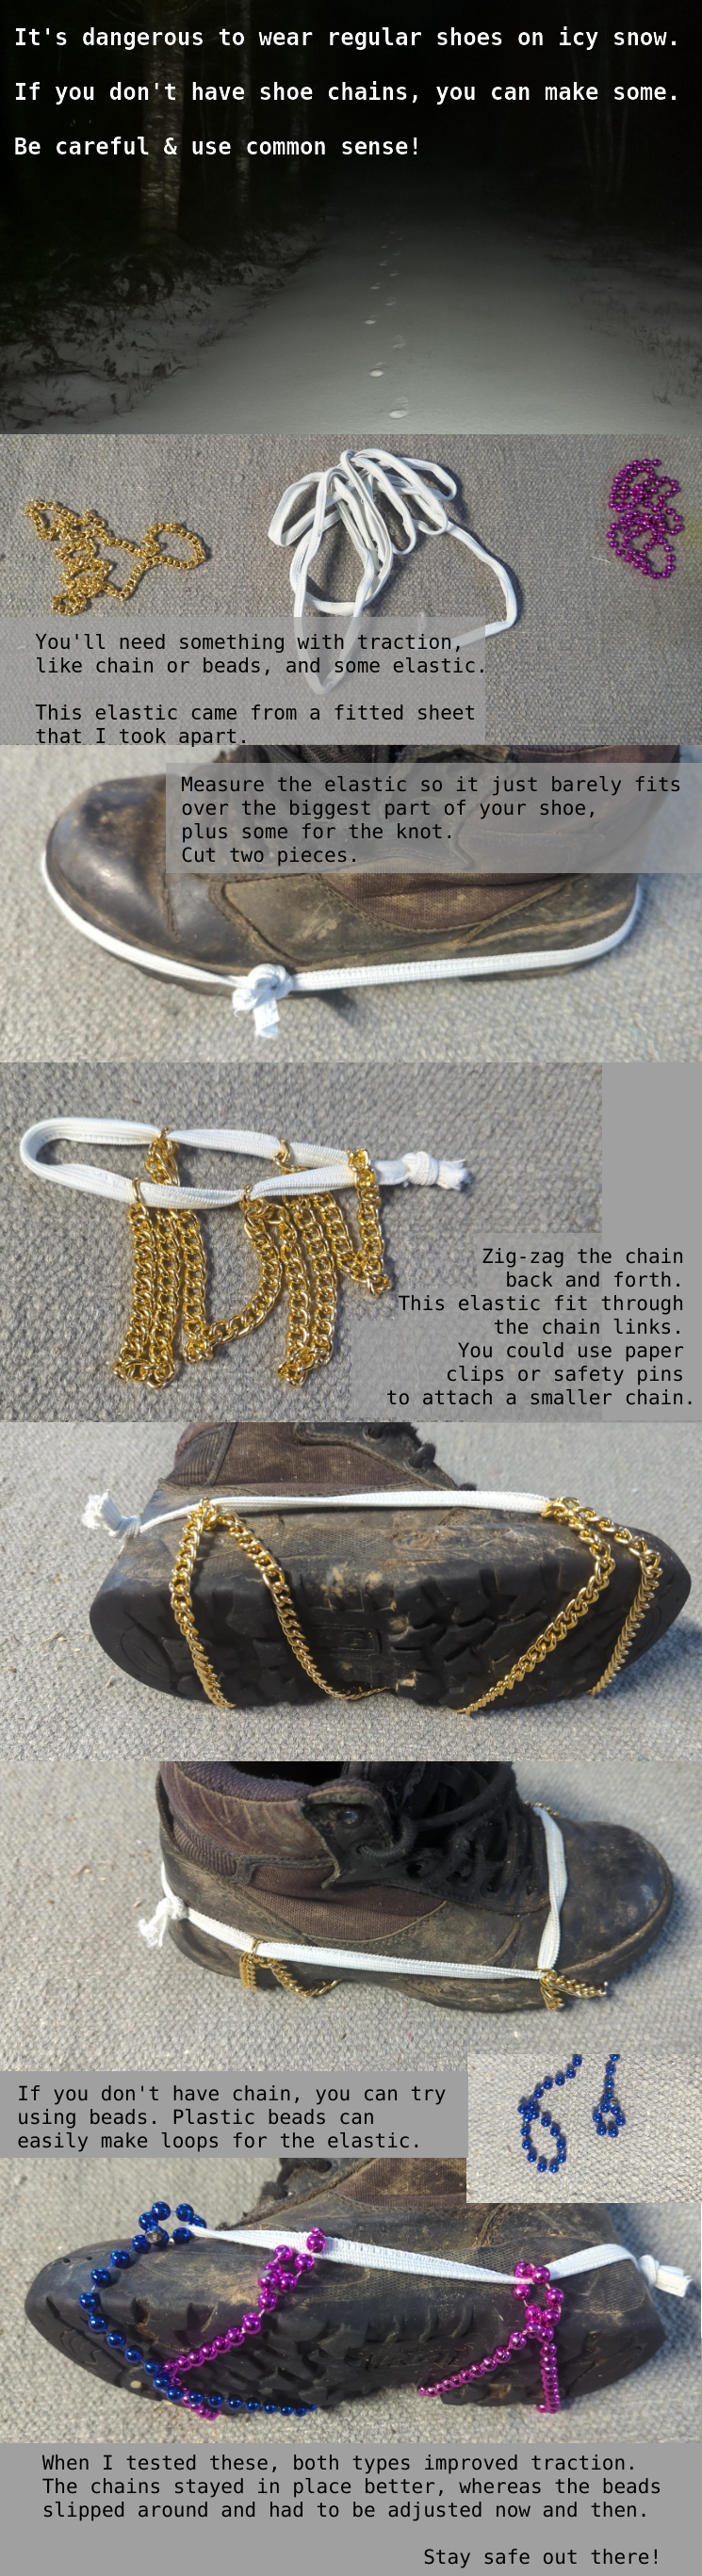
Shoe chains are just a stretchy part and a traction part. The traction part goes under the shoe and digs into the ice when you walk. The stretchy part keeps the traction part in place, and makes the whole assembly easier to put onto the shoe.
I made the stretchy part from some old elastic salvaged from a fitted sheet that was on its way to the sewing stash, but you could use elastic from anywhere. If you have a lot of hair ties, you could connect them end to end and make a loop the right size. If you have a lot of rubber bands, you could use those (just be aware that the stretchy part breaking would mean the chains fall off your shoe!). If you didn’t have anything stretchy, you could use an old shoelace and then tie it securely in place. If you used something without stretch, you’d have to get the knot untied any time you wanted to remove the chains from your shoes. The size of the stretchy part should be large enough so it fits over the biggest part of the sole of your shoe, but small enough so that it doesn’t fall off.
Chain works great for the traction part of the shoe chains. I used a piece of flimsy anodized aluminum chain that used to be part of some accessory; I forget if it was a belt or a purse. A steel chain necklace would work great, as would a spare wallet chain. The prototype with the chain stayed in place really nicely on my shoes when I tested it. I attached the chain to the elastic by threading the elastic through the chain links, so it made a zig-zag of chain in the loop of elastic. If the elastic hadn’t fit through the chain, I could have used safety pins or paperclips to connect them, or sewn it. The size of the chain should be long enough to get from one side of your shoe sole to the other, but short enough that it stays in place and doesn’t leave a lot of slack.
I also tested plastic mardi gras beads instead of chain. They gave me more traction than an un-chained shoe, but the round beads tended to roll about and move out of position on the shoe. I had to adjust the mardi gras bead prototype several times while walking around, and I didn’t have to adjust the chain one at all. If you’re building shoe chains out of beads, you’ll probably need to put more effort into getting them to stay where you want them. The nice thing about plastic beads is that, if you cross the string parts and twist them, you can easily attach any part of the strand to any other part.
All the usual disclaimers apply – be safe, use common sense, don’t sue me if this gives you an idea that gets you hurt. But if you do have to get from point A to point B on slippery ice, think about what resources you’ve got at your disposal for making that safer.