Résumé Improvement with LaTeX Macros
It’s career fair season at OSU, which means that I’m taking my annual dive into LaTeX programming in order to improve my résumé.
I’m discovering how powerful and easy to use the macros in LaTeX are. Let’s talk about why you might want to convert your résumé to LaTeX, and how to do it easily.
Why typeset your résumé in LaTeX?
1) Use version control. This is essential for putting back sections that you removed earlier, and for undoing mistakes.
2) Demonstrate technical competence. I want to work at the kind of company that hires applicants who enjoy learning the best tool for an important job, and LaTeX is the best free tool for beautiful typesetting.
3) More prettiness for less frustration. I personally hate fighting with a word processor’s GUI, trying to standardize various disparate sections and convince everything to align correctly. When your document’s appearance is represented as code, it’s also easier to copy and paste other people’s fixes for common problems that you encounter.
LaTeX Macros
If you’ve only used LaTeX to typeset math assignments and reports, its default formatting has probably worked fine for you.
However, résumés are a special case that requires identical formatting for multiple items. In my own experimentation and experience, résumés look best when all the section names are formatted identically, and when all the items within each section match each other.
Macros are LaTeX’s way of solving that standardization problem.
As the WikiBooks article explains, the format of a macro is simple. In the preamble (before \begin{document}), you define the macro’s name, number of arguments, and behavior:
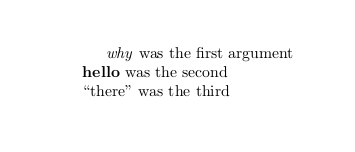
\newcommand{\example}[3] {
    \emph{#1} was the first argument\\
    % the double backslash forces a line break
    \textbf{#2} was the second\\
    ``#3'' was the third
}
Then in your document, you call the macro by passing it the number of arguments that were stated in the square brackets:
\example{why}{hello}{there}
The macro simply inserts its text, substituting in its first argument for #1, second argument for #2, and so forth.
Remember the backslash before the macro name when declaring the newcommand. Since the macro inserted the text as a paragraph, the first line defaults to being indented. To prevent default indentation behavior, put \setlength{\parindent}{0pt} in your document’s preamble.
My Résumé Macros
The most important macros in my résumé are the one which formats a heading, and the one which formats an experience. I include the ulem package for convenient underlining in the titles:
\documentclass{article}
\usepackage[normalem]{ulem}

\newcommand{\heading}[1]{
    \section*{\uline{\hfill #1}}
}

\newcommand{\experience}[3]{
    \item[{#1}, \emph{#2}]
    \hfill #3
}
In the body of the document, I can call each macro wherever it’s needed:
\begin{document}
\heading{Employment}
\begin{description}
\experience{Awesome Company}
           {My Job Title}
           {date - present}

    I did a thing and improved the buzzword by 40\%.

    Collaborated synergistically with diverse enthusiasm.

\experience{Old Company}
           {Just an Intern}
           {date - date}

    Wrote code and fixed bugs.
\end{description}
\heading{Education}
\begin{description}
\experience{Academic Institution}
           {The Degree I Got}
           {grad year}

    I had a GPA!

    I took classes in subjects!
\end{description}
\end{document}
Note that the indentation is decorative, but the blank lines are necessary to prevent LaTeX from assuming everything should be one line and wrapping only when the line is full.
With macros, LaTeX is actually easy to read! It becomes trivially easy to test changes – “what if I italicized all the job titles?” can be tested with half a dozen keystrokes, rather than the clumsily wielded flamethrower of global find and replace.
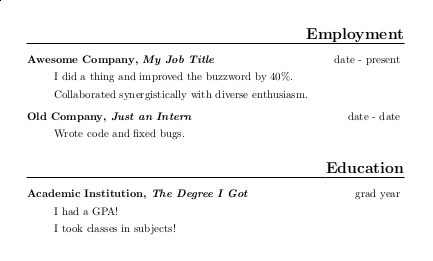
That’s what the code in this post looks like when rendered. Lots of prettiness, not very much code. My own résumé is only slightly more complex – most of the extra code is dedicated to shrinking the margins and reducing the spacing between lines in order to fit its content correctly onto a single page. (A PDF of my résumé is available here).
More LaTeX Tricks
To make quotes show up correctly, use `` for opening-quotes and '' for closing-quotes.
You can make C++ display more prettily, thanks to a macro from the FAQ. Unfortunately, most of it has to be a single line or LaTeX will add extra spaces:
\newcommand{\CPP}{C\hspace{-.05em}\raisebox{.4ex}{\tiny\bf +}\hspace{-.10em}\raisebox{.4ex}{\tiny\bf +}}